Wednesday, 7 December 2011

Frameworks and fings (to rhyme with things.. the fact is this is more difficult than I thought)


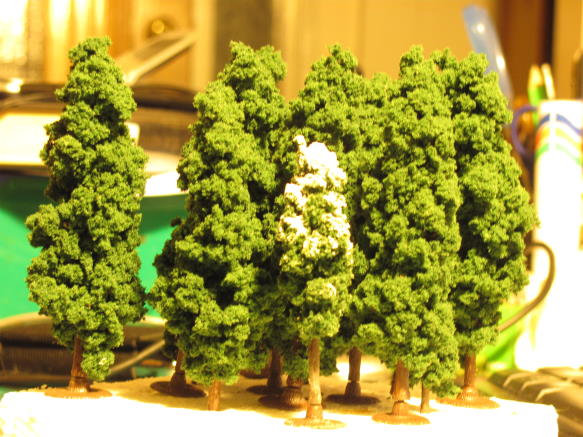
So in the business of getting the Christmas Tree layout ready, I missed a November posting. But as a concession, the Christmas Tree layout now has ballast on some of the track, ground cover texture, stone/rock coloured cliff faces, dusty snow capped mountains and similarly snow dusted pine trees. Also the wooden base has now been painted to give it a finished look which has highlighted the less finished look of the cardboard sides of the mountains and the very unfinished back of the diorama. So things to do include proper Masonite sides and backing cut to match the scenic profile. Also a better way of ensuring the two halves of the base are brought as close together as possible. Currently there are two possible solutions to bringing together the base halves: adjustable clamps with hooks or threaded rod and washers etc.


But then there are other considerations. After putting some of my longer rolling stock on the diorama, the tight curvature at the two sides really come into play, made worse by the not so well angled or centred tunnel mouths. Tight curvature has many downsides: it looks "wrong", trains are more likely to derail and too tight curves make for hard work if the track guage is not widened to allow for better running. Also about half way round the back of the tunnel the clearance height is actually lower than the portals indicate


And so I come to the word framework in this post's title: as with software, old cars and so on, there comes a time when maintaining the current setup is actually more "expensive" than cutting the ties and starting again. In order to solve some of the main problems with the current diorama, a remake becomes unavoidable. Increasing the radius of the ellipse would require a rework of the track and to do it properly would actually require a new larger base. To fix the tunnel portals would require a reworking of the "mountains" and in combination with the height of the middle section of the tunnel, a rework of the scenery would be required. Adding all the things together should mean a total rebuild.


The down side(s)? The trestle bridge that cost so many nights and and so much balsa and matchsticks would have to be rebuilt. More bridge track may need to be acquired, and would definitely need to be laid, weathered, ballasted and so on. Also some matching coded (height) track for the back section of the diorama that goes through the tunnel. Total re-scenicing would also be required: foam formers, plaster bandage shell, plaster rock facing detail, painting, ground cover, trees, snow...


The question then becomes do the cons out weigh the pros or vice versa? I certainly won't be making any rash decisions until I can attempt to try some of the further fixes like finishing the sides and back and the clamp or threaded rod ideas. After all, the diorama "works": trains go round a Christmas tree, trains go in and out of tunnels in snow capped mountains and over a trestle bridge.


So for posterity, luckily we have cameras to immortalise what will not last forever in any case.

Sunday, 30 October 2011

Thatched Cottages and Auto Trailers

Well October is nearly finished and it is time for another posting. I am being challenged painting a second hand already assembled Dapol OO scale Thatched Cottage The challenge is primarily in getting the effect of the dark timber framing and the whitewashed wattle and daub to be distinct (as they are in real life and probably any model that is not one piece of moulded plastic with raised sections to represent the framing). At this time I am working with paint and brush and not having the best of success.I am hoping that a coat of white over where I got carried away with the black and then using a black marker will give better results. I do not know enough about airbrushing to say that it would be a solution.


Meanwhile I have gone auto trailer mad. With a Father's day gift of a brand new Hornby 14xx, the perfect passenger rolling stock to go with it is a cream and chocolate auto trailer, as seen here with GWR 1450 in the perfect pairing I am hoping to emulate in model form. Hornby makes runs of the model in BR Maroon from time to time but I don't feel equipped to do a repaint (both with respect to tolling and skill). So an eBay purchase of a second hand Dapol (who inherited the plastic moulds from Airfix) auto trailer in the GWR colours for my intended modelling period has been accompanied by a detailing kit intended for the same model and a reference book about GWR auto trailers for the period I intend to model. Oh, and did I mention that postage on one book seemed a bad portion of the total cost? So I added two other books that feature stations on the Exe Valley line. The book cost to postage cost was still not brilliant, but beat the initial ratio of the postage costing as much as 2/3 as the book price. This seems to be the price of getting hold of what are becoming more rare and specialist materials.


While trains and railways are still with us and carrying bulk materials more efficiently than any other mode of transport, they are not what they once where to society. And of course steam trains and all that went with them have not been part of daily life for many decades now, more than half a century in some countries. While there are heritage railways and preserved examples of the steam age (some still running even!) and people who model these machines of the past, the market for source material on specific subjects must be quite small. Thus it becomes a case of seller's market and what the market can bear, thankfully the Aussie dollar is fairly strong against the English pound at the moment.


The photo for this post shows how bad my attempts thus far at painting the thatched cottage have been. Red outlines show the worst areas, though to be realistic, the whole thing could be one big circle at the moment. How will it turn out? Stay tuned for future posts :-) Next on my modelling calendar is getting the Christmas tree layout up and running, also adding the trees and then putting "snow" on the whole scene.


Friday, 30 September 2011

Rolling along

Train wheels, how important are they? The concept of steel wheels on steel rails is what makes railways more efficient than any other form of transport. It is what meant that animals and humans (before the use of steam or other forms of non-animal power) could move much heavier loads further and faster than over other forms of road. And so it is that I am enjoying converting all the wheelsets of my N scale rolling stock. I am really loving the low friction of the wheels as well as the improved appearance. Lower friction even than some of the older metal wheelsets where the metal was not well polished and so doesn't swish as nicely as the rolling stock does with the smoothly polished wheels.


Speaking of friction, I am learning how much resistance the motion of a steam locomotive (all those rods and levers and things) creates that inhibits the performance of the small and relatively weak electric motors that we power our models with. My N-Scale diesel runs much better than my N-Scale 0-6-0 and definitely as good as my N-Scale Berkshire until I did some lubricating of the motion. The big problem with lubricating models is that models have a high plastic content and not all lubricants are plastic friendly. Also there are the issues that happen in the real thing: "wet" lubricants can attract and retain particles that accelerate wear, any lubricant on the wheel's tyre, slipping can occur, which is undesirable, especially in models with limited power.


One of the wonders of the steel wheel on steel rail concept is that while it has low rolling friction, the wheels do actually grip. Early locomotives were engineered around the assumption that making the wheels rotate would not cause the train to move so alternatives were found until someone actually tried and found that there was and is enough friction for the wheels to drive trains.


Another consideration is conductivity. A lubricant that conducts can cause shorts across chassis, wires, wheels etc. A lubricant that insulates causes the opposite issue: if it gets in the wrong place, it will prevent the intended flow of electricity to the motor. Right now I am playing with a light oil but may go back to powdered graphite. Both have their pros and cons in all respects and only time will tell.


This post's photos relate to trees and glues. I am loving the power of EFD Simply Glues "Trees in minutes II" It does exactly what it says although it smells something toxic and melts cotton buds, or at least disintegrates them. The next step after this will be to apply spray adhesive and then some "snow"


Sunday, 14 August 2011

What to do when the world ends

More work has been done on the bridge (that is actually the ends of where two bridges meet) I mentioned in a previous post. I hope the in position pictures help make some sense of my design choices.


When designing a model railroad many choices are faced. One of the first is whether to copy a section of the real thing or to make it all up. Of course, this choice is a sliding scale where the middle is a model not tied to a prototype but not completely made up by the modeller, phrases like "based upon ..." might be used in a description of a layout in between these points.


Because my N scale shelf layout is only loosely based upon a concept, much of the design has come out of my head. Especially seeing the concept I used as a basis was not a prototype but John Allen's Timesaver puzzle and only loosely so. As a result, the arrangement and make-up of structures has undergone a few iterations in an attempt to come up with something plausible that fits the style I wish to invoke. That style being a switching section in down town Chicago in the 1940s. And yet I model Union Pacific who didn't have rails in Chicago until almost the turn of the century when Union Pacific bought the Chicago and North Western Railroad. Hence this is not based on a prototype when the time period is included in the setting. As result of the style choice, replicating a Chicago skyline is a big factor determining what structures are used. Why Chicago? In it's time Chicago served a huge number of different roads and had the famous train served stockyard right in the city (only the gate to the Union Stockyards remain in the present day) and perhaps most of all, Jack Delano's excellent colour photography of Chicago in the 1940's, for example


Why so many iterations with the structures? In order to make something that is "realistic." This is where following a prototype has advantages: the buildings are laid out in such a way that they "work" in the day to day functions that buildings have to provide. To have a realistic building layout then is just a matter of copying the prototype building layout. I have seen layouts with coaling towers that have no method of being refilled, buildings that have no apparent access, roads that are not shown to go anywhere, etc. All of these may be acceptable breaks from reality but then don't necessarily fit with my idea of realistic (plus the phrases, "break from reality" and "realistic" don't seem to go together well...) As a result, I still have some more track to lay in order to supply coal to the coal tower, build some sort of access to the signal tower, and I am sure there will be other tasks in a similar vein that I have not thought of or encountered yet.


The design of this bridge structure is an attempt to work within the bounds of a layout that is only a foot wide. What does one do when the world ends or the layout edges are met? I have taken the attitude that as the layout represents a slice of a world, so to that world gets sliced at each edge of the layout. The bridge then is sliced at each end to line up with the edges of the layout. The bridge goes across the layout at an angle in order to draw the eye across the layout as the eye also moves backwards and forwards along the length of the bridge, trying to make the layout seem deeper than it really is.


Malkara School's annual scale model exhibition was worth the trip, if only to see what has changed since last time. Exhibition purchases include a Triang brand GWR Colette coach and an assembled Dapol Thatched Cottage, both 2nd hand. Post exhibition purchases include Roof Brown and Reefer White paint, 0.35mm wire for handrails for the bridge and more Atlas 33" metal wheel sets (still more needed to be totally metal in the N scale wheel department...)


Anyway, the photos of the bridge in situ that may or may not explain why it looks the way it looks


Sunday, 19 June 2011

June ramblings and goings on

So time marches on and life gets busy and time to model seems to get pushed out by other things, let alone time to blog about the modelling you have little time to do. So what has been happening?


Hornby has started to (re-)produce an old favourite of mine, the GWR 14xx. What with my return to modelling British outline in OO and in particular a focus on GWR and its branchlines as a suitable subject for modelling, this was a must have. Thanks to my previous positive experience with eHattons, a brand new 14xx is on its way to our address for under 50 British pounds including postage. Paired alongside my 0-6-0PT 5775, these two locos represent typical examples of motive power for a GWR branchline in the time of the big four railways in Britain.


Now that the N-scale layout is inside, progress continues and running has resumed. I found and fitted some Atlas metal wheels to rolling stock that had either plastic wheels or large flanged wheels. They look, run and sound great. When the budget allows, more will be purchased to convert all my N-scale rolling stock to have those wheels. The extra weight at the lowest possible centre of gravity is nice too.


A card kit that came with a magazine will add to the collection of OO brick buildings that do not have enough room on the current 4' by 3' HO/OO loop up and over. While it has been an interesting exercise, it does not come up to the finish possible with the Superquick kits, but it was "free" if you don't count the cost of UK modelling magazines from the news stand in Australia (only a few come in just under $10) but that is another story...


I am baulking from the final assembly of a girder bridge that has been split into two parts to make two bridges that join part way across the 12" wide shelf, at an angle of ~15 degrees. Once glued, there will be little chance to go back so I am getting carried away with dry runs, double sided tape mock ups and so on.


Anyway, signing off for now, here are some pictures of another mock up of the bridge:


The concept behind this bridge is that the shelf layout is a "slice" of reality, and if you had a bridge that went across that reality and then that reality got sliced, this would be the result in model form. It also disguises one of the end of the layout where reality also stops abruptly on the other axis. I hope that makes sense, if not, it may do when photographed on the layout in situ.

Monday, 11 April 2011

Steamfest 2011

Well we are back and well from Maitland's Steamfest 2011, our first ever.


Quite a weekend: Steam trains, steam trucks, steam traction engines, heritage diesels, heritage rolling stock, contemporary coal trains around 89 cars long rumbling through in the night, lunch from a tram done up as a pie shop, Frontline Hobbies at Newcastle...


The two main demographics seem to be: 1) older folk reliving transport days gone by and 2) young families after a day out. Both seem to be well catered for (although I consider myself in-between those two categories age-wise) as there is plenty of carnival rides, carnival stores and so on for the younger crowd and plenty of exhibits (static and moving, including the train rides) for those who wish to grab a bit of yesteryear


The train rides were a great experience and there is a real feel of camaraderie on the train with the staff and fellow travellers. I never realised what fun it is to take photos from a moving train. Fast shutter speed is very important here :-) Much of the photography of full size trains was learning what works and what does not. Being too close does not, having people crowded in does not, having a slow shutter speed does not, trying to get great video from our camera does not (no focus once video is recording, no image stabilisation, no HD...)


There were less serious model shops/outlets than I thought(hoped)there would be although one stall had Hornby's live steam Flying Scotsman and some build your own static steam engine, and traction engine kits! That is until we went through Newcastle and spotted the Frontline Hobbies store on Hunter St, but that is skipping ahead.


Friday: Drove to Maitland. Highlights: ROAM toll tag worked, we made it there safe, Coachstop Caravan park management were helpful and friendly with directions and setting us up when we did get there & coal trains running through the night over the road (yes, the sound of trains has not lost all its magic despite continuous welded rail). Lows: driving through Sydney, even for a short time, realising we forgot the suitcase that had the wife and daughter's clothes (Off to the local Kmart and things looked better).


Saturday: up, breakfast and get ready to go. First stop, the rally ground: Steam trucks, traction engines, horses, donkeys, pavilions, kids area and much more that we probably missed. Then over to the station to be ready for the 11:30 to Newcastle. Stopped to look at the model train in the signal box: Australian modelling has come a long way since the times you had to scratch build nearly everything and Australians now proudly display our country's colours and idiosyncrasies in model form. Down to the platform and off we go after taking some snaps of 3526 who will be right behind our carriage. On the way I learn much about photography on a moving train, where we can have lunch not far from the station and spot Frontline Hobbies, another short walk from the lunch spot and importantly, past an ATM. Caught 3265 departing which had been at the other end or our train to Newcastle in stills and on video. While lunch was going on, 3642 came in and left and I managed to get a few shots and some okay video. Then off to Frontline, a shop I have ordered from over the internet and been very happy with. Their store is excellent and I managed to keep spending to a reasonable limit by selective purchasing. I had not realised there was only Frontline store and where it was but now know and will keep it in mind in future. Back to Maitland, much ash and smoke and more camera learning. We then took a quick walk around the other side of the main bridge to get an idea of what was over there: the carnival area and more markets to look at tomorrow. Off to shops for ingredients, back to cabin, cook dinner & sleep as the coal trains rumble trough at regular intervals


Sunday: Up, breakfast, pack everything into car to go. First stop rally grounds again, longer stay, more looking at pavilions, sample bags, miniature train rides, running off to get photos of full 3642, 3526 and 3265 as they left on various trips. Too much can be enough though so over to the dodgems and break for lunch. Many varieties of food though most not so healthy. Then down the Church St stalls. Apart form the carnival stuff which we were fortunate to be able to ignore. Soaps, doll's clothes, train mugs, books & nibbles were all purchased in due course. There was a bunch of layouts on view at the CWA hall, one of which was at Kaleen last weekend! And then off to Woolworths for some hydration for the walk to the car and the car trip home.


So a worthwhile weekend and we would seriously consider doing it again next year, although not until next year, to give us a chance to recover. Some things to keep in mind: keep your gold coins handy as many things are gold coin entry, a good camera makes a big difference, wear sunscreen and a hat and good walking shoes, plan ahead but remain flexible as things can change and you won't want to miss the train that leaves from a different platform due to having to fit the Steamfest schedule in with the regular passenger and freight traffic.


And now to the video and still shot I am most proud of, or at least the still shot, the jury may still be out on the video :-)


Thursday, 31 March 2011

Expos and exhibitions

Well the Canberra Model Railway Expo 2011 is on its way and we Rogers are all excited. Or at least we Rogers who are train fans are all excited. Many years ago AMRM looked into what it was that makes the magazine crew go along to model train exhibitions and expos, in an article titled "Menangle Again!" after a disparaging comment from a member of the public who was not so happy to see the same layout again.


As a former Brisbane boy who has moved to Canberra which has a smaller population from which Rail modellers might come, the inevitable is true: the variety of layouts is less than it was in Brisbane and even in Brisbane I got used to certain layouts being there for years running


So is this a problem?
I say no.
As an "active" modeller (I hope that working on models or a layout once a week helps keep me out of the armchair modeller category) I can learn new things from seeing the same layout with 12 months in between for me to grow as a modeller. In that 12 months my focus can have changed, I might have tried new things, or I might see a new thing to try that I will try this year that I wouldn't have last year.


The other aspect of model train expos and exhibitions is for my children. They give me the chance to show them better and bigger layouts than I can show them at home. Luckily the "u drive" layouts give my younger children the chance to do what they do here at home: drive trains.


Another positive aspect of model train expos and exhibitions is vendors: people selling train stuff, especially the second hand store. There are a limited number of model train outlets in Canberra but at the model train expos and exhibitions here, vendors come from New South Wales and all around to sell to a captive market, and I for one am grateful!


Anyway, that's it for this month (only 2 and a half hours left anyway) but I hope to post some photos of the expo and any significant purchases next week

Saturday, 26 February 2011

Evening Stars and floor polish

Sneaking in a February entry before the month ends :-) Evening Star Dapol plastic kit is now completed. And I don't think I have been more satisfied with the outcome of a plastic kit in my hands.


The finishing touch (decals) made all the more glorious with a product that in Australia is called Pledge One Go. It is a floor polish made by Johnson and Johnson under various names world wide. Through the Internet I learned that while there are many specialist products for surface preparation for decals, there was one that might be under my kitchen sink. And indeed there was and indeed it worked as well as most had made out.


This somewhat begs the question, what did modellers do before the Internet allowed them to share ideas? Having read just a few magazines and books of modelling tips, none compare to watching a video of someone else doing the thing you have never done before but want to try. Clubs are possibly the closest to where this sort of thing could happen: watching someone else perform a technique you are not familiar with. And yet clubs tend to meet at fixed times and in places not always nearby and certainly rarely in one's own home. The convenience of the Internet being in one's own home, 24/7. Also the joy of pause and rewind because I missed what happened just there or want to see it again.


And yet in 2011 I note that other things are being lost. Steam is dying, slowly but surely. Heritage and preservation groups are doing their best but the reality seems to be that the expiry of a steam locomotive's boiler certificate is a death sentence, or at least requires major pause for concern. Ah melancholy.


Looking forward to Steamfest in Maitland in April for that very reason: 3 full size operating steam locomotives in one place. As a child of the 70s in Australia, not something I have experienced in living memory. For further melancholy, something that would have allowed my dad to relive his more youthful days, had I learned of this while dad still had more days on this earth.


So in order to avoid a triple bout of melancholy, a shot of the end result. I can see many flaws: the surface is not flawless under scrutiny, paint lines are not as crisp as I would like, and some of the decals are a little off level or not 100% straight along their length (observe the orange border on the tender) but as above, this plastic model is my "Most voted to give me contentment". And as a last note, yes, the wheels rotate and the valve gear works (though one of the axles is not dead true so she needs a good push to make things rotate)


Saturday, 15 January 2011

Happy New Year!

Well I missed a post for December and it's half way through January already :-( Currently railway modelling in the Rogers' house has taken on more of a OO English outline. GWR specifically, although I have yet to narrow down the time period.


Why English in OO? Probably Thomas and Friends. Having been looking into the real life trains behind the world's most popular blue steam train has evoked fascination and nostalgia.


Fascination because England at one time had many little branch lines with stops not big enough for a station so they were called "halts". These branch lines make for great modelling opportunities because of their size. I love the idea of Chicago in the United States back when the stock yards were in operation and there were was a ridiculous number of railroads that stopped or went through the city, but modelling even a small part of that would require a huge indoor space. Modelling a significant part of an English branch line on the other hand is not such a big problem, if one compresses the distance between railway features like stations, crossings and halts.


Nostalgia because English outline OO was how my modelling years just prior to my move to N Scale were spent. At that time modelling in a new scale meant changing scales as finance was at a premium at that time, so for N scale to come, OO had to go. The thing I now miss most from that collection is the Collet 0-4-2T 14XX as done by Airfix all those years ago. Ubiquitous on GWR branch lines as a sturdy little engine, it would seem any GWR modeller must have at least one of these in their collection but all the models that were made of them are no longer in production. Airfix, Dapol, Mainline & Hornby (both as the prototype and as the loco "Oliver" from the Thomas series) have all tried their hand at making them but they are no longer producing them.


A Birthday purchase though (set to arrive quite soon from a reliable dealer in the United Kingdom) is another GWR branchline must have: the 0-6-0PT Pannier Tank locomotive as made currently by Bachmann Branchline. By all accounts a great performer and once she has arrived, photos will soon follow. And the Thomas connection? On the island of Sodor, the pannier tank loco's name was "Duck".

Christmas layout improvements have been so extensive as to point out issues with rolling stock rather than the layout: running is now much improved with reliability to the point were trains could be set to run unsupervised for a time. If that statement seems ridiculous, you have either never modelled in N scale or done a much better job with track laying than I. I now have a list of things I wish to do to the rolling stock and so on given the layout itself is running so well. Not that it is finished in any way of course, what would be the point?


Hopefully that is enough for now, I better get back to watching a HD trip along the Bergen Line in Norway. And for the geeks out there, one of the stations (Finse) is Hoth!


And what's a post without a picture? Latest project on the go, a Dapol un-motorised locomotive: Evening Star. English yes but BR so post-GWR days but she is painted GWR's trademark Brunswick Green