Sunday, 27 December 2009

Quick P.S. to the tunnel/hill proof of concept

Season's greetings all, sadly it took this long to sit down and write something...
Anyway, to make sure it is quick, it's mostly 2 photos of the hill/tunnel thing now that it is textured and portalled.

Brown acrylic paint, PVA glue brushed on, "grass" and sand sprinkled on the glue, sprayed successive layers with dilute glue, more texture, tunnel portals cut from heavy card and coloured with pastels. All now fixatived to prevent/minimise hill dandruff!

Sunday, 15 November 2009

Christmas Project, Proofs of concepts, part the next, and the second

Well here I am after many weeks of no updates. As the "Ready to run and be displayed by December" deadline loomed closer and life was getting busier, it became important to do some more work on the project rather than blogging about it :-)


Back to proofs of concepts, or this time around, "try stuff to see if it works and if I like it" which proves the concept too.


I'll get the most embarrassing thing out the way first: using flux while soldering, now that I have done it, is as good as they say. I should have been using flux 20 years ago, oh well. Makes for less melted sleepers/ties, a neater finish, a quicker job...
So flux has proved itself as a concept, it is just sad that it took me so long to try it :-(


The next proof was making the elipse of track that would fit on the baseboard and seeing how things would run on it. An elipse rather than a simple circle or an only slightly more complex oval would make for more intriguing visuals with a nearly constantly varying radius. What did I learn from laying the elipse on the flat board and running trains? Yes: my Union Pacific 119 4-4-0 with three 30 foot long Overton coaches looks great on the elipse! It was also the first time she had run so well as she does not run so well over points on the Peco code 55 track of my shelf layout, but the elipse was cheap flex track (probably code 80 or more) with no between the track hazards. My UP 4466 0-6-0 (She started life as some other railroad and number but when the paintjob is finished, UP 4466 she will be) also ran just fine. Not so my 2-8-4 (formerly of the Nickel Plate but being repainted to a UP scheme, not that Union Pacific ever ran Berkshires but this is my railroad!) that had trouble at the minimum radius sections of the elipse that are equivalent to the practical minimum radius for N scale: 9 3/4 inches. Sad but good to know before I raise the track and watch my largest N scale locomotive fall off the trestle bridge!


Another thing I wanted to test before I used the technique and/or product on the actual December project was what I planned to use for the scenery base: plaster bandage coated foam. Having saved some foam from the bin at work and gone back to my local Riot Art and Crafts store (I do regret the day they entered my life so close to my workplace) for some plaster bandage. The foam was not the traditional expanded polystyrene that makes a great mess when you cut it. So a basic hill/mound shape was cut out and taped together out of the foam layers and then I got to work with the plaster bandage. It does require working/rubbing in the water and after it has been laid on the foam shape to get a good effect instead of looking like gauzy cloth with some plaster on it, but that was a good lesson learned on the experimental mound with tunnel rather than on the full display. The photo for this post shows the as yet unpainted and untextured mound with some of the earlier gauzy looking bandage technique.


Anyway, a short post to make up for the length of the last one, not counting the time between drinks :-)


Sunday, 18 October 2009

Christmas Project, Proofs of concepts, part the first.

In the last post, I threw in the phrase "proof of concepts" or however I spelled it that time. What is a proof of concept in this case? At work we model solutions to real world business problems in software and use proofs of concept to see if the conceived solution will meet expectations without being required to implement the whole solution. For this Christmas project, I wanted to try a few things I had either not done or only done to certain levels.


My last project was in HO scale and saw me making an "up and over" double loop that meant I had built my track raised off the plywood base for the first time. The Christmas project requires the track not to have grades (as the HO up and over does) but to be well clear of the solid base to allow the scenery to fall away from the track so that I could do something I had not done before: build a trestle bridge. In a way, each model project is a proof of concept but some things require a small trial run before building a bridge that scales out to many hundreds of feet long.


When modelling, we are trying to represent reality. In software, this means we have to cover all the required business rules while allowing the end user to work in a way that makes sense, is logical and comfortable. In model trains, the aim can differ from scale to scale but overall it is to show railroading in miniature. In the largest scales, this extends to the function, particularly of the locomotives:


  • Many large scale diesel-electric locos have an internal combustion engine that drives a generator that powers motors geared to the wheels, just like the prototype.

  • Large scale steam locomotives have an operational firebox that heats the water in the boiler that expands to push the cylinders which move the motion to turn the wheels.


Would that modelling was a simple case of putting real world objects in a "reducer", twisting a dial for the desired scale and out pops an exact detail but smaller version of the real thing. Whilst it is frequently possible to obtain smaller versions of the materials or components that make up real world objects (tubing n smaller sizes, thinner plate materials, and so on) certain aspects do not scale. The most noticeable are strength and weight. Some of this comes down to the physics that make it unlikely we will ever have a "reducer" as described above: the space occupied by an atom is largely made up of the electron cloud (not going beyond my high school physics as sub atomic particles are not required to explain the dilemma) which cannot be compressed as its size is dictated by repulsive forces which, as far as I know, cannot be changed.


This is why a model of locomotive 3265 that is 1/160th the size of the real thing it is modelling does not weigh 356kgs while being only 11.4 cms long! In a way, it is good for my bench work and back this is not the case :-) The other aspect of materials important to modelling is that the smaller they are, the less strength they have to the point of failure. This means that a model handrail that is able to withstand general wear and tear will be thicker than it should be in the smaller scales where materials reach their limit and snap or break. Sometimes changing materials allows smaller and thinner representations but even if you used single strand carbon fibre in models, you would still reach a limit, though in this case it is more likely to be one of cost.


So in the smaller scales, certain things will appear fatter or thicker than they would if the model were a simple reduction of the real thing. It was mentioned above that large scale models follow the function as well as the outward form of their prototype. N Scale live steam models are rare and tend to be done to prove a point more than as good way to power such models. Most N scale models, then, are built to look like the real thing rather than be the real thing in miniature.


So to the trestle bridge. What does a real trestle bridge look like and how where they built? The Internet can be your friend here in terms of how others have done it as a model and photos, plans and drawings of the real thing. Most examples on the net I found were larger scale, O or above, so what I ended up doing was the same, only different. The question the proof of concept was to answer here was, "Can I simply build a bridge that is strong enough and looks right just by following the techniques the original bridge builders used?"


The answer seems to be yes, sort of: in the place of bolts and other fasteners I have aquadhere, but otherwise, the proof of concept was built using a suitably reduced printout of the plan labelled "Standard Trestle Bridge, California Central Railway." Templates for the bents (upright bits that go between the ground and the track) seemed to be the key to having the bridge look right every time. Instead of the usual wood block formers, I used pins with the heads trimmed off. Balsa wood from my friendly Riot Arts & Crafts store made up the bents which then had diagonal matchstick braces to space out and separate the bents.


What did I learn from building the proof of concept?


  • Templates are your friend (I guess frameworks would be the software equivalent)

  • Some things can be built using the same techniques as the real thing, it helps that trestle bridges were meant to be quick and easy to build when you wanted to cross a gap. Strength on the real things was not their...strong point. Speeds over trestle bridges tended to be limited and don't be up there when it's windy!

  • Soaking wood in strong cold tea makes it a lovely rich wood colour: darker than balsa or matchsticks really look BUT don't soak glued parts, they come apart :-( That is another reason proofs of concept are good, if they break, less tears are shed and it can be easier to get back to something that works

  • Only use as much glue as the joint needs else it runs and splodges everywhere

  • All structures are just assemblies of smaller parts, no matter how intricate or complicated they look. Have a go, start small, work up, and eventually you can build the whole thing.

  • A long post this one and some physics and perhaps philosophy, but now to the pictures; the template I used and the trestle bridge proof of conept


    template
    template_with_uprights


Friday, 9 October 2009

Christmas Project, foreward

Well, the time has come for an update. The main reason this blog was started was to have a more permanent record of the places in Robertson and Mossvale we can recommend for food and shelter. The ongoing reason for this blog, though, will be trains. Large and small trains, but mostly small as my life in Canberra precludes regular association with large trains; 12 inches to the foot scale!


My current small train project is a bringing together of a number of ideas that have been floating around in various stages this year. One of those ideas is a reflection on the popular conception of model railroading which was summed up in a work mate's question about me having model trains at home. It went something like, "Do you have mountains and trees? tunnels and bridges?" I wish to say from the outset that this is an excellent question and puts a real dampener on much of the petty stuff that passes between modellers and rail fans. Those not in the train fraternity would not necessarily know the difference between a riveted and a welded tender and if they do, they probably don't really care, and I say shouldn't have to.


So came idea one: for the enjoyment of as wide an audience as possible, a model should have the afore-mentioned elements i) mountains ii) trees iii) tunnels iv) bridges. In a shopping centre near my workplace, a Riot! craft store had recently opened and as it was mid-winter here, had a display using craft elements to create a winter scene. White expanse populated by snow men made from polystyrene balls, glitter, snowflakes, etc.


And along came idea two: have a winter scene, a train running through winter snow. Now nowhere in Australia that I know of do trains run in snow covered scenes, except for freak weather conditions which send rail fans out with their cameras. "Luckily" I run Northern American trains in the scale I wanted to make my next train project in. I say "luckily" because at times following an overseas prototype has had its challenges. Australian Christmases are a time of cold cuts, barbecues, salads, rusty Holden Utes and kangaroos pulling Santa's sleigh because it is high summer here; cyclones and bush fires can be Christmas visitors here in Australia. But as previous, I model northern hemisphere trains and so Christmas is snow, cold, roasting chestnuts, open fires and so on.


And then as idea one and two floated together, idea three began to grow: the next project could be a model where a Christmas tree plays a central part. Northern hemisphere prototype, north American prototype, more specifically Union Pacific prototype.


The Union Pacific goes back as far as being part of the first railroad to cross the United States, known as The Continental Railroad in some circles due to the American transcontinental being the first to cross a continent anywhere in the world. At the joining of the two sides of the transcontinental, a ceremony of great pomp and circumstance took place and centre stage where two trains, one from each railroad. The steam power at the front of the Union Pacific train was 119, of which I have a model in my collection, and some old style Union Pacific coaches. And what type of bridge does such a train travel over? An equally old style wooden trestle bridge, of course!


So the ideas coalesce: A winter scene with mountains, tunnels, trees, a wooden trestle bridge and a way to work this into the base of a Christmas Tree. Fortunately from a previous rental property I had a wooden base that had supported some cupboards but now could do other duties. So all the pieces were together in my head, now how to make them a reality? Join me in the next part of the journey in Chapter One.


P.S. And to whet the appetite, here's a photo of some trials of concepts. Can you spot the wheels not on the rails? I didn't till I enlarged the photo for editing. Now I see why so many photos end up getting published with such "mistakes": the proof of concept has since done its work and to set up another such photo would require much rework. So in this, what you see is what you get, sorry folks :-(


Monday, 5 October 2009

Cockatoo Run 2009


Well the Rogers headed out to the Southern Highlands for a weekend (or at least one night) away from home. We can hugely recommend the Pirouette Cafe which was not booked out busy like some other places in Robertson but deserves to be busier: food and service was great, prices and quantity reasonable too.


The weather was a carbon copy of the same time last year, granted it was raining but one of the nearby towns is named "Moss Vale" => valley of moss anyone, lots of rain and dampness? Raincoats were packed so we were not too uncomfortable.

The Fountaindale Grand Manor was as nice as it sounds without costing as much as you would expect, buffet breakfast on Sunday morning was a nice addition too.


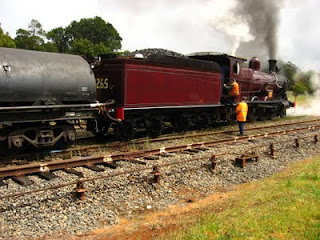
Off to the Railway fair at the Robertson Heritage Railway Station. Whilst there were stalls selling hot food & drinks, local produce, toys, scented soaps, candles, flowers, the main event for the day is the arrival of the Cockatoo Run train from Sydney. This year 3265 was on loan to 3801 limited from the Powerhouse museum who had recently finished restoring the 100 something year old loco to running service. And don't forget "vintage" ALCO diesel 4501 on the back as help in times of trouble. The Rogers had purchased a family ticket from Robertson down to Mossvale and return; it was to be my daughter's first steam train ride. Quick photo shoot at Robertson station and off the 6 carriage train went. Much steam, smoke and ash in the eye as we sat in the beautiful wood panelled carriages owned by 3801 limited, ah the goodness


Lunched at Mossvale and again we can recommend the New Astor Cafe, really we only needed one fish and chips and then we would have got through it. Icing sugar on your pineapple fritters? Yes please! Not everywhere does that. Salt on the fish and chips? No thanks :-)


Then back to the Mossvale train station for the designated time of departure, which was not to be. But this gave all the train fans a chance to take in a through freight that changed crews and a CityRail voyager/explorer. Oh, and did I mention 3265 having her water gin filled and the coal moved forward in her tender? And 4501 posing with her sides open for whatever reason that made for some interesting photos that prominently display her ALCO heritage. In our cabin we had the pleasure of sitting with a gentleman who was a living tome of history on railways in NSW, good for me and my son who hail from QLD, and my wife who hails from WA learnt some stuff too! I never got his name but I am sure many who were on the Cockatoo Run would have had the opportunity to hear some great stories.


The run back to Robertson saw us sharing the same cabin with the gentleman mentioned earlier and another family. One of the great things about the weekend was how approachable most people were, striking up conversations with people who shared at least one common interest (trains) allows you to go on and find more common interests and meet some great people. Off the train at Robertson and 3265 gathers steam for the home run. The crossing 100m up the track meant for great opportunities to capture the train's departure.


All in all despite rain and cool, a great weekend, especially for us living in Canberra were the track mileage is, shall we say, somewhat limited :-(
See you there for Cockatoo Run 2010!